How to Start a WordPress Blog in 5 Minutes (step by step for non-techies!)
/The two most intimidating parts of starting a blog are setting it up and hitting publish for your first post. I knew I wanted a self-hosted WordPress blog (and you do, too), but I was so overwhelmed with the thought of setting it up that I had a friend do it. It took him less than 5 minutes. When he explained everything he did, I felt silly.
You can start your own WordPress blog with very little technical know-how. I promise. Just follow these steps.

1. Name Your Blog
What will you write about? Will your blog evolve over time?
If you have ideas for blog names, Google those names and see what comes up. Even if it's not already taken, you'll want to know what you'll be associated with.
Unless you have a great blog name in mind and are sure you'll keep blogging about the same topic, I recommend using your actual name. Here's why:
- It gives your blog/business room to grow and evolve.
- If you make money from your blog, you don't have to file a DBA (Doing Business As).
- It's just easier.
2. Choose Hosting + Register Your Domain
a. Save yourself time and energy and go with BlueHost.
Yes, I'm an affiliate, but I'm only an affiliate because I love the experience I've had with them. For $4.95 a month you get your domain name, unlimited space and excellent support. Head over to the site and click "get started now."

b. Register Your Domain
During the next step you'll choose your domain name. Enter your idea in the New Domain box and see if it's available. If you already purchased a domain from a different service, use the box on the right.

c. How to Choose Bluehost Package Options
This was the confusing part for me. There are so many add-on options. Do you really need any of them? No, not to get started. Here's a breakdown:

- To get the good pricing deal, you'll have to pay for a year or two in advance. However, the longer you register your domain in advance, the more trustworthy Google believes you are. So this will help your SEO.
- The only option that could potentially matter is the WHOIS privacy. This hides your personal information and replaces it with Bluehost's address and contact information.
- If you don't care for specifics, skip to step 3!
For a detailed explanation, I consulted my awesome tech partner:
Learn more about SiteLock here
XSS Scripting Attacks - This is redundant... It's like saying Cross-Site Scripting Scripting Attacks. Also! You won't have to worry about them, same with SQL injection attacks. XSS used to be a big thing with Wordpress last summer, and thousands were hacked but it's been cleaned up pretty well.
The only way you would be vulnerable to these attacks are through your webforms or if you accept variables through your URL (which you won't be doing anything like that). The one webform I would imagine you using is a contact form and that's easy to secure. There's an easy way to test your site for XSS vulnerabilities and I'll do that before we're done, but I seriously doubt you'll have that problem.
App Scanning - This could be useful if you were running older versions of Wordpress, but otherwise not really. They'll have a list of known vulnerabilities they will search for - similar to virus scanning software - but anything that's new they won't know about.
All the other scanning and monitoring services are ok, but you probably will never need them. You are only susceptible to these blacklists or spam lists if you leave your site unsecure and someone hacks you. If you've done that you'll probably have more problems to worry about than simply being on a blacklist, but we won't do that. I also keep backups of sites I'm working on so even if you do SOMEHOW get hacked, we'll be able to restore everything. I've never had my own work hacked, but I have fixed problems from other poorer websites.
Domain Whois Privacy - When you buy and put a website online, you are responsible for providing contact information for 3 positions: Registrant Contact, Administrative Contact, and Technical Contact. Sometimes there is a Billing Contact listed too. All of these are probably the same for you, it would just contain your name, address, and phone number. Anyone in the world can access your whois info by searching your domain name on a tools website.
The nice thing about Domain Whois Privacy is that it replaces your personal contact details (that you used when you register your domain) with the company's contact details.
Now none of this REALLY matters if you intend on putting your personal contact details directly on your website anyways, but if you don't then you may want to consider domain privacy.
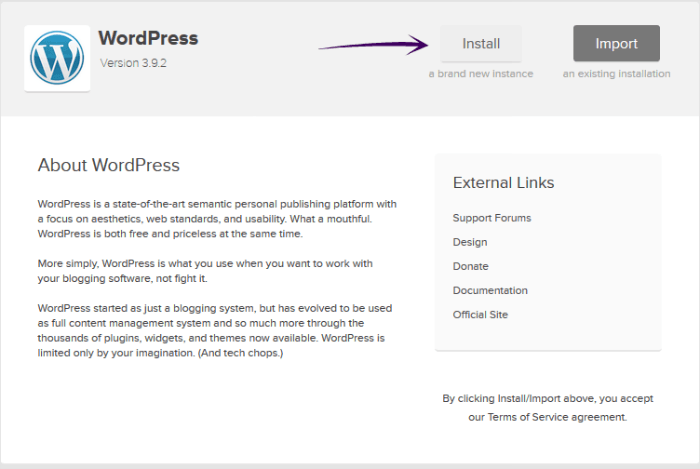
3. Install WordPress
a. Login to the BlueHost Home screen. Under Website, you'll see a button to Install Wordpress.

b. Choose to install a new instance. On the next screen, I recommend leaving the "directory" blank. Some people choose to display blogs as www.website.com/blog, but this isn't necessary.

By selecting "advanced options" you can choose a username and password, rather than using ones generated by Bluehost. I highly recommend doing this!
4. Sign in to Your WordPress Dashboard
You can sign into your Wordpress dashboard through Bluehost or through your domain. The default is usually www.yoursite.com/wp-admin.
You're ready to start working on your blog!
5. Choose a WordPress Theme
WordPress gives you a few free themes to start with. Once logged into your WordPress account, you'll see a left hand menu. Choose "Appearance" and then "Themes." You can customize them to make them your own. Remember, you can always change your theme later when you have the basics down.
If you're ready to get more involved, start looking for your ideal theme. You can browse on Wordpress.org, search on Google, or use a site like Theme Forest. This is where I found mine.
6. Add Plugins
a. I recommend the Under Construction plugin while you set things up. Go to "Plugins" on the left hand menu and choose "Add new" to start adding plugins. Search "Under Construction." You'll have to activate this plugin once it's installed.
b. Just don't forget to disable this plugin when you're ready to go live!
7. Edit Your Settings
a. Under "settings" you'll want to edit your General Settings, select your time zone and how you'd like to format the date.

8. Get started!
a. Further customize your theme. In the left hand menu, choose Appearance --> Themes --> Customize. This is where you'll edit your sidebar, menus and widgets (boxes or apps in your sidebar).
b. Add a few helpful plugins. A few I recommend installing are JetPack for analytics, Akismet for spam filtering, Yoast SEO + SumoMe for social sharing. These are not necessary to get started, however.
c. Start writing! I recommend having at least 5 posts published before launching your blog. This way people will have more to read when they visit.